Discover Paper Art in Leonardo AI — Why Every Layer Matters
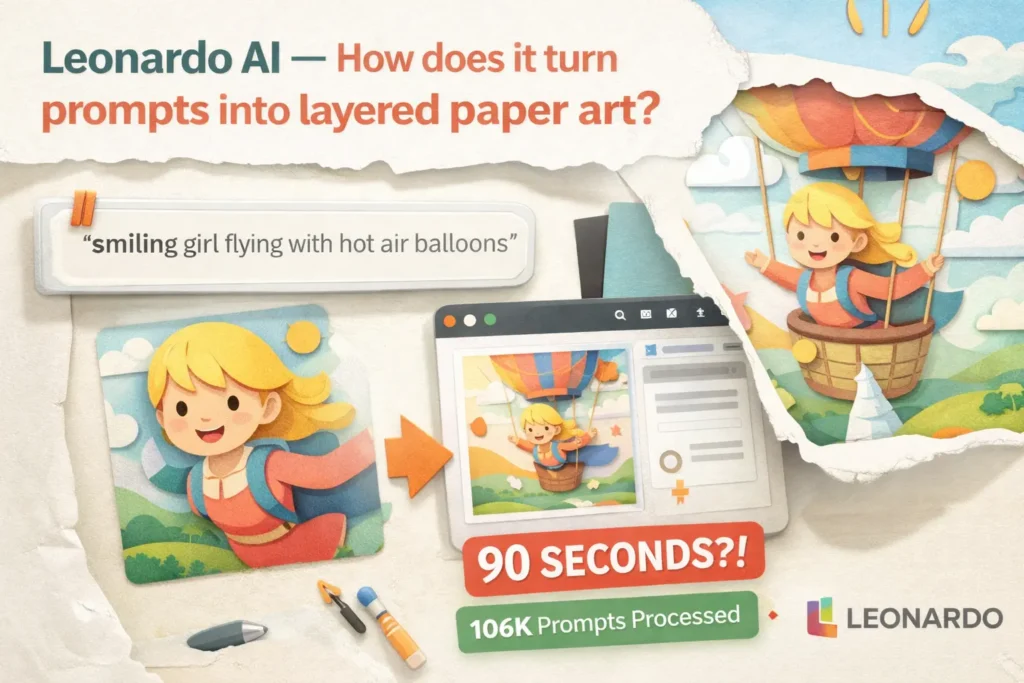
Leonardo AI Paper Art Style can create stunning print-ready paper art. In just 90 seconds, achieve layered, tactile designs that look handcrafted and professional. Try it now, follow the workflow step by step, and see real results for children’s books, posters, UI icons, and all your creative projects. Paper Art — also called paper cutout, layered papercraft, or pop-up diorama — is an aesthetic consisting of stacked planar elements with crisp contours, tactile grain, and soft inter-layer occlusion. In generative-AI NLP framing, think of the prompt as the input sentence describing objects and layout, the style token as a conditioning key that biases the generator toward “paper-like” priors, and masks as explicit attention masks that constrain the generator to produce specific subregions with separate textures and rendering parameters. The disk drive, like handcrafted diorama photography: flat color planes, razor-sharp edges, empty depth cues from thin drop shadows, and subtle paper grain.
Use cases include hero images, children’s book advances, print posters, and P.O.D. goods, as well as minimal UI illustrations and educational dioramas, where readability and likeness clarity are paramount. Within Leonardo AI, you achieve this by linking explicit style conditioning with cool regenerations (img2img) and layer-specific masks that enforce per-region texture and shadow action.
Why Paper Art Wins — Real-World Uses You’ll Love
From a perspective of design intent and audience signal:
- Branding & hero images — conveys warmth and craft; the constrained vocabulary (flat shapes, bold silhouettes) improves clarity at scale.
- Children’s books — high legibility, tactile appearance, and print-friendliness.
- Print-on-demand — flat palettes and bold shapes map efficiently to print inks; easy to separate for spot finishes.
- UI & micro-illustrations — retains silhouette at small sizes; low-detail primitives keep recognizability high.
- Educational dioramas — communicate depth without heavy 3D modeling, faster iteration cycles, and lower render variance.
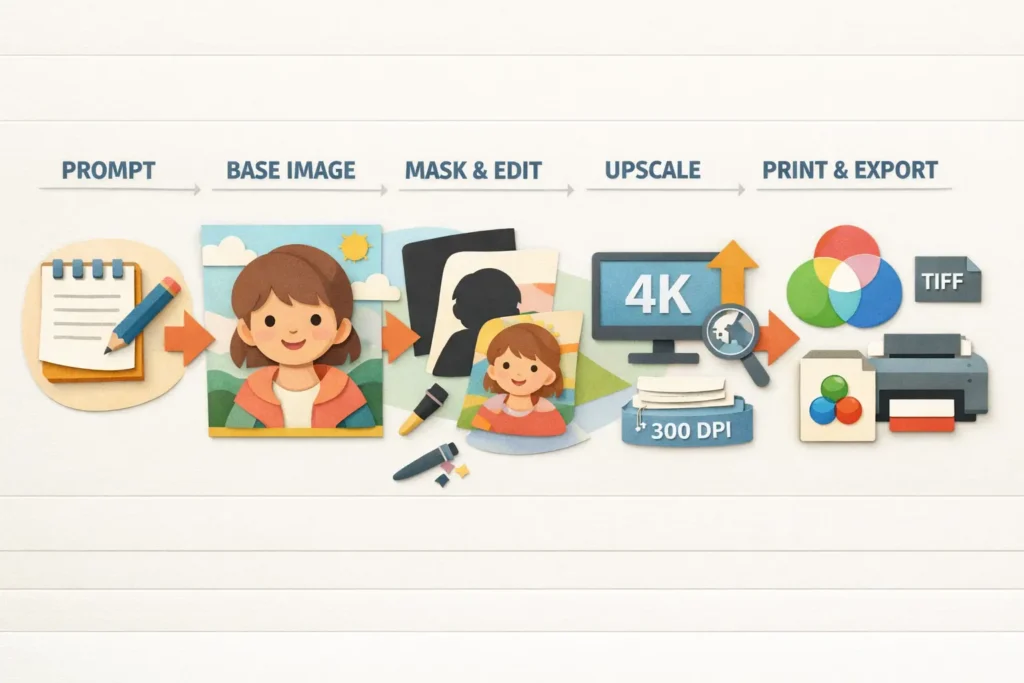
The Secret Workflow Behind Perfect Paper Art Every Time
Treat the entire project like a deterministic pipeline:
- Input sketch (silhouette tokenization) — produce a high-contrast silhouette image that acts like a “structure prompt.”
- Initial generation (structure pass) — text-to-image with style conditioning; low style strength to preserve silhouette tokens.
- Segmentation (mask creation/attention masks) — produce per-layer masks that function as attention masks during conditional generation.
- Conditional generation per mask (img2img) — regenerate each mask area with layer-specific prompts and texture priors.
- Compositing (merge & postprocess) — assemble layers, add inter-layer occlusion (shadow layers), fold highlights.
- Upscale and proof (finalization) — use dedicated upscalers; convert to CMYK, proof, export TIFF, and layered assets.
- Deliver — final TIFF (print), layered PNGs, README with prompt + seed + model + settings.
Unlock Leonardo AI Features That Make Paper Art Effortless
- Text-to-Image (T2I) — primary sequence-to-image generator; the prompt is the input sentence.
- Style tokens/references — conditioning vectors that bias the latent toward paper-cut priors.
- Img2img + Masks — conditional regenerators where masked areas are re-synthesized while preserving structure (analogous to constrained decoding).
- Universal / Ultra Upscaler — domain-specific super-resolution that preserves edge fidelity (a post-generation refinement transformer).
- Export options — final file formats (PNG/TIFF) for downstream production pipelines.
The Hidden Mask & Img2Img Workflow Pros Don’t Tell You
This is the reproducible pipeline designers use to produce print-ready layered paper art. I’ve framed each step in operational and parametric terms.
Start with a strong silhouette
Create a black-on-white silhouette at your target aspect ratio (square often works for portraits). This silhouette is your structural token — it constrains downstream decoders and keeps silhouette drift low.
Base Generation
Input: Text prompt + optional style reference image.
Settings: low style strength to ensure the generator preserves silhouette tokens. Export at the highest in-app resolution available. Save model, seed, sampler, and other metadata in a README.
Why: The base generation provides color and layer suggestions while anchoring composition.
Create masks per layer
Create transparent PNG masks (foreground, midground, background, accents). These are explicit attention masks for img2img: they tell the conditional generator where to rewrite and where to preserve.
Tools: Leonardo mask editor or external editors like Photoshop, GIMP, Affinity.
Img2Img Tricks That Make Each Masked Layer Pop
For each mask:
- Upload base image + mask.
- Settings:
- Preserve structure: HIGH (prevents silhouette drift)
- Style Strength: 10–40% (lower for structure, higher for decorative flourishes)
- Seed: fixed deterministic seed for reproducibility
- Sampler: deterministic sampler if available
Adjust prompts per layer:
- Foreground → heavier paper grain, thicker shadow contact
- Midground → balanced texture, medium shadow
- Background → subtle texture, soft shadows
Export each layer as a transparent.
viewpoint: each masked img2img pass is a conditional Generation where the mask is an attention constraint, and the per-layer prompt is a sub-instruction that updates the latent for selected tokens only.
How to Make Layers Pop — Composite & Shadow Secrets
Assemble layers in Z order. Add subtle inter-layer shadows:
- Gaussian blur 10–40 px (depending on final resolution)
- Opacity 10–60% (foreground stronger)
- Add a thin fold highlight along the top edges (overlay white at low opacity)
Keep a single light direction so all occlusion signals are consistent.
Final color & texture pass
Add a faint, global paper grain texture at low opacity (2–12%) to unify layers. Export a layered PSD or layered TIFF so printers can access separations and for future edits.
Pro Img2Img Settings That Guarantee Perfect Paper Art
- Preserve Structure: HIGH — prevents silhouette drift during constrained decoding.
- Style Strength: 10–40% — low for structural fidelity, higher for decorative passes.
- Deterministic Seed: set and store seeds for reproducibility; it’s your versioning system.
- Mask Feathering: 1–3 px — subtle feathering helps blending without softening edges.
- Layer Count: 3–6 for thumbnails; more layers for large, complex posters.
- Lighting Consistency: Enforce one light direction across all masked generations.
- Batching: save masks and batch-process similar layers when doing series work.
How to Upscale & Export Paper Art Like a Pro
Leonardo’s Universal and Ultra Upscalers are analogous to domain-specific super-resolution models. Use them as final refinement steps, then do color conversion and proofing in a color-managed environment.
Upscale workflow
- Use Ultra Upscaler for the final pass when available on your plan.
- Inspect edges post-upscale; use local smoothing for small artifact reduction.
- Apply a subtle unsharp mask after upscaling (Amount 10–20%, small Radius) to restore edge crispness.
Convert to CMYK and proof
- Convert the final file to CMYK using Photoshop or Acrobat Preflight.
- Proof at 100% — colors that are wide-gamut in RGB may clip in CMYK.
- For litho or specialty printing, get printer profiles (ICC) and run a soft proof using the profile.
Recommended print formats
- Web / social: PNG (transparency supported)
- Print: TIFF (no compression or LZW), or high-bit PNG at 300+ DPI
- For spot varnish or specialty finishes, ask your vendor about separate plates/spot channels.
Licensing & commercial use
Leonardo.ai’s Terms of Service define rights and commercial allowances. From a governance perspective:
- Free/public assets may have broader platform rights — check TOS.
- Paid tiers often provide expanded commercial licenses.
- Maintain provenance: save prompts, seeds, and model versions in a README to prove origin and reproducibility.
Compare Tools & Steps — Quick Guide for Paper Art
| Stage | Leonardo.ai feature to use | Why it matters |
| Base generation | Text-to-image, style tokens | Capture look & silhouette quickly |
| Structure control | Upload reference images | Anchor Composition |
| Layer generation | Masks & img2img | Produce separate paper layers |
| Refinement | Per-layer style strength | Different textures & shadow depths |
| Upscale | Universal / Ultra Upscaler | Reach print DPI with fewer artifacts |
| Export | PNG/TIFF, CMYK (external) | Print-ready deliverables |
The Truth About Paper Art — Pros and Cons Revealed
Pros
- Fast iteration with text prompts + style references.
- Mask workflows let you generate real paper depth and separate parts for print.
- Built-in upscalers ease the path to high-DPI output.
Cons
- Licensing and public/private rules can be tricky — TOS matters.
- Upscalers trade off some characteristics; test on your image types.
- Masking adds manual steps — but that’s the price of reproducibility.
Consistency Made Easy — Top Paper Art Tips from Pros
- Silhouette-first. Paper art reads by silhouette; keep shapes bold.
- Limit layers for thumbnails (3–6).
- Single light direction — shadows must agree across layers.
- Feather masks slightly (1–3 px) to avoid hard aliasing.
- Use negative prompts aggressively to remove painterly aliases.
- Save prompt + seed + model — reproducibility is gold.
- Export separate PNGs with transparency for flexible compositing.
- Use subtle grain only — too much speckle looks noisy when printed.
- Proof in CMYK at 100% before full print runs.
- Automate repetitive parts (batch upscales, saved masks) to scale production.
Why Paper Art Fails — And How to Fix It Fast
- Edges look fuzzy/painterly: Add negative prompts (painterly, watercolor), increase preserve structure in img2img.
- Shadows too harsh: Reduce opacity, increase blur, adjust Z-order.
- Overly detailed textures: Lower texture modifiers in prompts or remove photographic descriptors.
- Print colors differ: Convert to CMYK early, do soft proofing using the printer ICC profile.
Paper Art FAQs — Everything You’ve Wondered About Leonardo AI
A: Yes — Leonardo’s Learn hub and style resources cover style tokens like paper cutout and usage tips.
A: Often yes, but check Leonardo.ai’s Terms of Service and whether assets are public/private. Keep prompt and seed logs.
A: High-res TIFF (no compression) or high-bit PNG at 300+ DPI; convert to CMYK for commercial printing.
A: Generate at the highest in-app resolution, use upscalers, and carefully apply sharpening after upscaling.
Conclusion: Master Paper Art and See Stunning Results
Leonardo AI gives you the building blocks to make paper art quickly and reproducibly: style tokens, masks, img2img passes, and upscalers. The true edge is process: silhouette-first → mask per layer → img2img per mask → composite → upscale → CMYK proof. Publish this as your pillar resource with downloadable assets, and you’ll teach readers how to reliably get great results.