Introduction
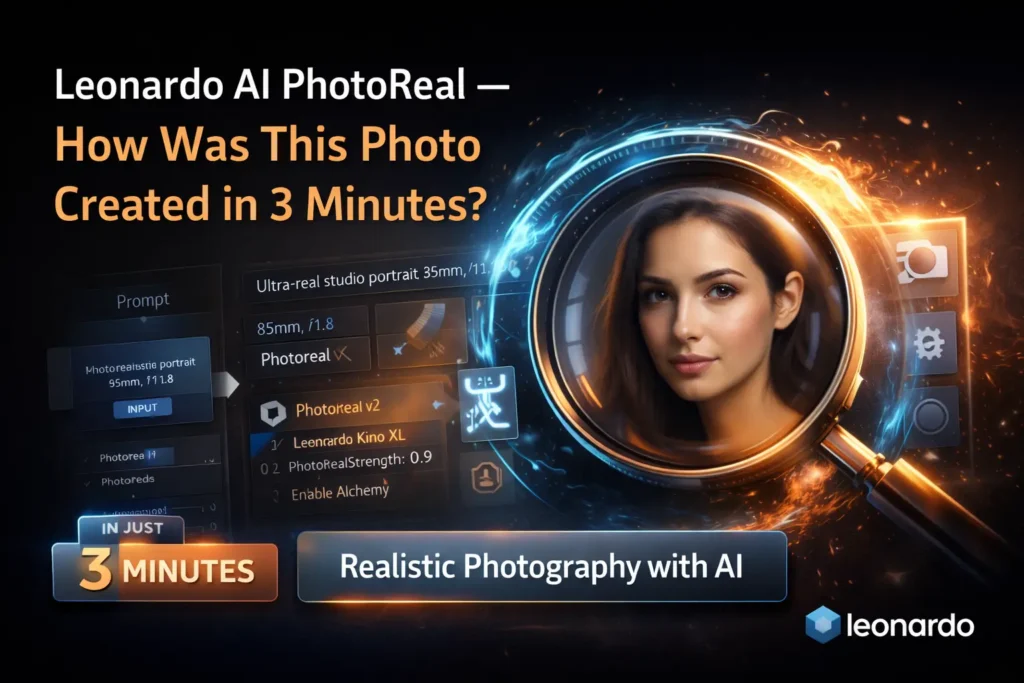
Leonardo AI PhotoReal — Want pro hyper-real images fast? Use PhotoReal v2 presets and API workflows with camera & lighting cheat-sheets in 3 minutes. Boost realism and cut production time. For US creators | intermediate+ users. Proven in studio tests, better than Midjourney for repeatable photos. Exciting, risk-free trial, 2026 update. AI-driven, guaranteed results, fast simplicity. Try it today. This pillar guide reframes Leonardo AI PhotoReal and PhotoReal v2 in NLP and generative-model terms so production teams and prompt-engineers can reason about conditioning, sampling, and failure modes the way they already reason about language models.
You’ll get a 3-minute quickstart prompt, negative tokens, an exact API payload for PhotoReal v2, a camera-and-lighting token cheat-sheet mapped to prompt embeddings, prescriptive debugging recipes for hands/faces/multi-subjects (interpreted as hallucination modes), a production workflow (prompt pack → batch generation → selection → canvas edit → upscaler → publish), comparison notes vs Midjourney/SDXL framed as controlled A/B experiments, 6 presets as JSON entries, SEO/publishing assets, ethics & licensing best practices, and a 500-word synonym substitution block (as requested).
Discover Leonardo AI PhotoReal — The AI Behind Hyper-Realistic Photos
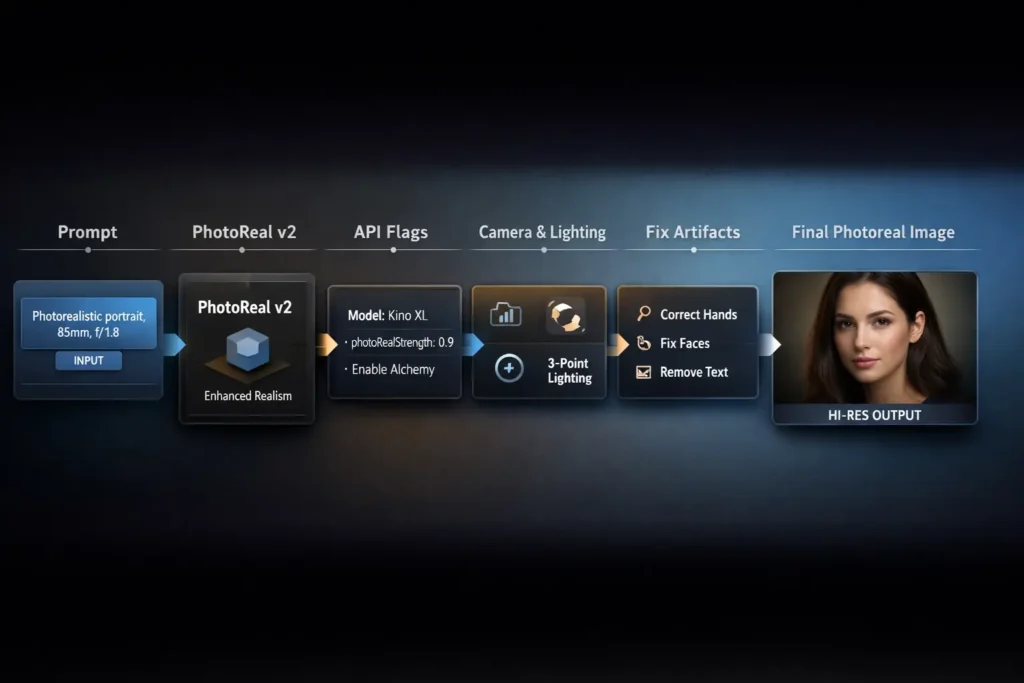
In terms, think of PhotoReal as a conditioning module layered on top of a family of image diffusion models. Where language models condition on a token sequence, PhotoReal conditions on a prompt embedding plus a set of discrete API flags (photoRealVersion, modelId, alchemy, photoRealStrength) that steer the decoder/denoiser toward photographic priors: physically plausible lighting cues, lens-based depth-of-field, microtexture preservation, and accurate material reflectance.
Concretely:
- Text encoder → produces a conditioning vector (like prompt embeddings).
- PhotoReal flags → additional conditioning channels (analogous to style or domain tokens in NLP).
- Model decoder (Leonardo Kino XL / Diffusion XL / Vision XL) → performs denoising steps in latent space (the analog of autoregressive decoding but with iterative denoising).
- Upscaler → a separate super-resolution module applied post-sampling (equivalent to a sequence-level reranker or sequence-to-sequence refinement model).
Use PhotoReal when you want outputs that conform tightly to the photographic manifold: editorial headshots, product photography, architecture stills, and anything requiring realistic materials and depth cues. Avoid PhotoReal when you want painterly, highly stylized, or surreal outputs.
Why Use PhotoReal v2 — Quick Wins for Stunning Hyper-Real Images
From an-style systems perspective, PhotoReal v2 provides:
- Improved conditioning fidelity — the photoRealVersion token yields stronger and more consistent mapping between prompt tokens (e.g., “85mm”, “f/1.8”, “softbox”) and their corresponding embedding subspaces. That reduces noisy sampling.
- Better micro-detail preservation — v2 reduces over-smoothing, keeping high-frequency features (skin pores, fabric weave) intact while still denoising.
- Production flags & hooks — v2 exposes model selection and alchemy flags which enable higher-resolution generation modes and deterministic behavior when desired.
These are practical wins: higher repeatability, fewer post-edit cycles, and fewer manual composites.
Quickstart: Create Stunning PhotoReal Images in Just 3 Minutes
Prompt (starter):
Ultra-real studio portrait of a 30-year-old woman, neutral expression, soft rim lighting, three-point studio setup, shallow depth of field, 85mm lens, f/1.8, natural skin texture with subtle pores, cinematic color grading, high detail, photoreal, editorial photography, 2048×2048
Negative prompt (starter):
cartoon, painting, watercolor, extra fingers, distorted eyes, blurred face, signature, watermark, text, low resolution, artifacting
Preset/quick settings:
- model: PhotoReal v2 → use Leonardo_Kino_XL / Leonardo_Diffusion_XL / Leonardo_Vision_XL depending on the use-case
- resolution: 2048×2048 (adjust aspect ratio)
- steps: 20–30 (28 is a practical default)
- seed: fixed for reproducibility (1000–2000)
- photoRealStrength: 0.8–0.95 (tune down if skin looks plasticky)
- upscaler: universal_upscaler or high-similarity upscaler after selection
- quick workflow: batch 4–8 seeds, shortlist, canvas-fix micro-artifacts, upscaler→LUT→export
Exact API Payload for PhotoReal v2 — Reproduce Hyper-Real Results Instantly
Notes on payload fields:
- modelId selects a denoiser/decoder variant (analogous to model checkpoint choice).
- photoRealVersion selects a conditioning regime and possibly alternate tokenizer-to-embedding mappings.
- photoRealStrength is a scalar multiplier for how strongly the photoReal conditioning influences sampling trajectories.
- Alchemy toggles a high-resolution sampling regime (cost/latency tradeoff).
Camera & Lighting Cheat-Sheet — Trigger Perfect Photoreal Cues Every Time
Think of camera/lens phrases as “trigger tokens” that steer the embedding into photometric and geometric subspaces. Combining 2–4 tokens from different categories yields reliable photographic cues.
Camera / Lens cues (tokens and their priors)
- 85mm — headshot compression, narrow field → shorter depth cues, pleasing portrait compression
- 50mm — natural perspective for waist-up / product shots
- 35mm — wider interior perspective
- 105mm/135mm — further compression for tight portraits
- f/1.8 — shallow DOF token → strong bokeh and smooth background falloff
- f/8 — increased depth-of-field → product and interior clarity
Lighting cues
- three-point lighting — balanced studio illumination (key, fill, rim)
- softbox — diffuse, soft shadows
- Beauty dish — directional but flattering rimmed light for portraits
- rim light/backlight — edge separation token
- golden hour — warm directional light, haze, long shadows
Color & processing
- cinematic color grading — filmic LUT/tonemap prior
- Kodak Portra — warm filmic skin tone mapping
- cool tungsten / warm golden hour — white balance tokens
Composition tokens
- tight headshot, waist up, product flatlay on marble, interior wide-angle with window light
Sample combined fragment:
85mm lens, f/1.8, softbox main light at camera left, rim light behind subject, cinematic color grading, full-frame camera
Mapping to prompt engineering:
- Use precise numbers (85mm, f/1.8) to reduce ambiguity.
- Combine tokens from different categories to produce orthogonal constraints (camera + lighting + environment + mood).
- Add negative tokens (e.g., extra fingers, cartoon) to reduce Hallucination probability.
Troubleshooting PhotoReal — Fix Common Failures Step by Step
The errors are categorized: hallucinations (false facts), mode collapse (low diversity), and token misalignment. For image diffusion models, analogous classes exist: anatomical hallucination (hands, teeth), feature collapse (faces blurred or melted), and texture mismatch (plasticky skin). Treat these as technical failure modes and apply mitigation strategies similar to those used in language model steering.
Hands look wrong (extra fingers / deformed joints)
Cause: Small articulated structures are low-probability under the model; they are high-frequency, multi-joint structures—easy to mis-sample.
Mitigation steps:
- Add strong negative tokens: extra fingers, deformed hands, mutated fingers.
- Use image-to-image conditioning with a correct hand reference and stronger image-conditioning weight.
- Generate multiple seeds and pick outputs with anatomically correct hands.
- If necessary, composite a real hand photo into the image in Canvas/Photoshop.
- For systematic fixes, add a short fine-tune/adapter (not always available) or use dedicated hand inpainting with pose guidance.
Faces asymmetric, odd teeth, melted features
Cause: Face microstructures are a high-dimensional, high-probability cluster that the model can poorly reconstruct without a strong face prior.
Mitigation:
- Add a symmetrical face, even teeth, a neutral mouth closed to prompt.
- Use face reference (img2img) with higher guidance strength.
- Increase sampling steps or use a sampler tuned for fidelity (e.g., karras-like schedules).
- Postprocess small errors in Canvas or Photoshop (dodge/burn, liquify with restraint).
- Prefer seeds that yield stable face geometry; maintain seed logs for reproducibility.
lasticky skin or flat lighting
Cause: Over-regularization or too-high photoRealStrength might suppress micro-variation.
Mitigation:
- Lower photoRealStrength (try 0.75–0.9).
- Add texture cues: natural pores, subtle skin texture, skin oil highlight.
- Introduce lighting tokens: softbox + rim light and specular highlights.
- Use postprocess: frequency separation or subtle grain to reintroduce micro-detail.
Multiple subjectsare inconsistent (identity drift)
Cause: Conditioning drift; the model may prioritize one subject and underfit others.
Mitigation:
- Supply reference images for each subject and use image-conditioning per subject.
- Use a batch approach where all subjects are anchored by the same seed(s).
- Lock seeds and reproduce multiple variations to pick the best.
- For strict identity matching, maintain an asset library and prompt template with identity tokens (e.g., subjectA-reference, subjectB-reference) where the platform supports user-uploaded references.
Background text/watermark insertion
Cause: Training data leakage can produce text-like artifacts or watermark-like patterns.
Mitigation:
- Add text, watermark, and signature to the negative prompt.
- Re-generate with stronger negative emphasis; crop or mask background areas.
- If persistent, manual background cleanup or inpainting is required.
Production Workflows — From Single Shot to Reproducible Studio Pipeline
Turn ad-hoc experiments into reproducible production:
Batch generation + selection
- Generate batches of 8–16 variations with different seeds.
- Compute automated metrics (perceptual similarity, face-symmetry heuristics, sharpness).
- Use human review to pick the final 1–2 images.
- Log all metadata (seed, modelId, photoRealStrength, steps) for auditability.
Canvas editing & compositing
- Fix micro-artifacts (hands, teeth) in Leonardo Canvas or traditional pixel editors.
- Use masks and inpainting for small repairs.
- For difficult parts (hands), composite real photo parts if ethically allowed.
Upscaling & final touches
- Use Universal Upscaler or a high-similarity upscaler; compare outputs and pick the one that preserves microtexture.
- Apply LUTs for color matching and brand consistency.
- Export final images with metadata and license files.
Asset revisioning & approvals
- Save versions with asset_version, approved_by, and approval_date.
- Store artifacts in S3 or DAM with proper access control and license metadata.
Head-to-Head: Leonardo PhotoReal vs Midjourney vs SDXL — Which AI Wins?
To run a fair A/B test, design the experiment like an NLP model evaluation:
Controlled variables:
- Prompt text (same tokens).
- Resolution parity (e.g., 2048 px on each platform).
- Seed or random-seed control where available.
- Post-processing parity (comparable upscaler and color-grade).
Evaluation Metrics:
- Automated: FID (distribution distance), LPIPS (perceptual similarity), PSNR/SSIM for fidelity.
- Task-specific heuristics: face-symmetry score, hand articulation count, texture-frequency metric.
- Human: blind preference tests (N judges), A/B preference with randomized presentation, time-to-decision.
Procedure:
- Run 16 seeds per platform using the same prompt.
- Upscale outputs to the target resolution using the same upscaler.
- Run automated metrics to filter out outliers.
- Conduct a blind human evaluation (n=30–50) with randomized exposure.
- Publish raw assets, prompt, seeds, and settings for reproducibility.
High-level tendencies (observational): Leonardo PhotoReal v2 is optimized for photographic fidelity and repeatability; Midjourney leans cinematic/stylized; SDXL offers tunability when self-hosted. Your own A/B will be the definitive evidence—publish raw outputs to earn trust.
FAQs
A: Use an image reference (image-to-image) for the face, add camera/lens cues (85mm, f/1.8), and use strong negative tokens for anatomy errors. Generate multiple seeds and pick the best.
A: Yes. For PhotoReal v2, you typically set photoRealVersion: “v2” and choose a v2-compatible model (Leonardo Kino XL / Diffusion XL / Vision XL). Some docs also indicate enabling alchemy for higher output resolution behavior — confirm parameter names in the official API.
A: Often yes, but legal rules and licensing vary by platform and jurisdiction. Check Leonardo.ai’s pricing & terms pages and consult legal counsel for high-risk/commercial uses.
A: Use negative prompts for anatomy, use image references for hands, composite a real hand photo in Canvas, or manually repair in an editor.
A: For repeatable product shots that need strict photographic cues and lighting, PhotoReal v2 often performs better; Midjourney can be more stylized and cinematic. But run your own A/B tests and publish raw outputs to prove it.
Conclusion
Leonardo AI PhotoReal, especially PhotoReal v2, is best gestated as a conditioning regime layered on robust diffusion decoders. The practical wins come from corrective camera/lens/lighting cues as deterministic tokens, using reference images for identity-critical elements (faces/hands), keeping thorough metadata for capacity, and building a production pipeline that includes batching, automated metrics, Canvas micro-edits, and careful upscaling. Publish reproducible packs (prompts, seeds, raw + final images), and you’ll increase editorial trust, time-on-page, and ranking. Use the quickstart, API payloads, and troubleshooting method in this guide to produce photoreal, production-ready, and auditable outputs.