3D Texture Generation vs Image Guidance — Which Workflow Wins in 2026?
3D Texture Generation vs Image Guidance: choose 3D generation for massive, fast asset production and image guidance for pixel-perfect material fidelity.
Struggling with time-consuming PBR workflows? 3D Texture Generation vs Image Guidance this guide shows how to match method to need, compare speed, accuracy, automation, and scale, and gives a hybrid process to save weeks while keeping cinematic detail—surprising results guaranteed. Act now, see impact.
When I first started texturing 3D assets professionally, the painful reality hit me: a beautiful sculpt or model still looks dead without believable surface detail. I’ve spent late nights fixing stretched UVs, repainting seams, and hunting for reference photos that match a director’s vague request (“make it feel older, but not too worn”). Over the last few years, I moved from hand-painted maps to hybrid AI-assisted workflows. That shift didn’t remove the problems — it changed which problems matter. Now I’m often deciding whether to sprint with automatic generation (fast, high-variance) or to slow down and match photo references (accurate, labor-heavy). This guide walks through that exact decision: what 3D Texture Generation is, how image-guided texturing differs, when to pick which, and how to combine them so your assets don’t just look “AI-made” — they look real.
What Is 3D Texture Generation vs Image Guidance?
- Clear, practical definitions (what each method actually does in production)
- Technical foundations you need to know (UVs, UDIMs, multi-view stitching)
- Side-by-side comparison (speed, accuracy, control, cost)
- Real-world pipelines for games, film, and product renders
- Hands-on Blender + Substance examples and prompts
- Research and tools to try (papers and repos you can read now)
- Shortcomings, limitations, and who should avoid these methods
- Real experience/takeaway and three candid personal observations
What is 3D Texture Generation?
Short definition: 3D texture generation uses automated algorithms — procedural systems or AI (often diffusion models adapted to 3D contexts) — to synthesize full PBR texture sets (albedo, normal, roughness, metallic, AO) for a mesh from non-image inputs like text prompts, geometry, or a small set of rendered views.
Why this matters in practice: when a studio needs hundreds or thousands of props and environmental assets, manually painting each map is prohibitive. Automatic generation scales: you can seed variations, create randomized material sets, and produce “good enough” maps for secondary assets that never get close-up screen time.
How it typically works
- Prepare geometry and UVs (or use automatic UV generation).
- Render the mesh to multiple camera views (multi-view sampling).
- Use a diffusion or procedural engine to generate partial texture patches per view, often conditioned on prompts or parameters.
- Stitch and blend those patches into a single UV/UDIM texture space.
- Generate auxiliary maps (normals, roughness) either inside the same pipeline or from separate material estimation steps.
- Polish in a painter (Substance Painter, Blender) if needed.
Notable research and tools that demonstrate or implement these ideas (readers who want the academic foundations can start here).
- Text-driven research like Text2Tex shows how depth-aware image inpainting plus multi-view view-selection can progressively synthesize consistent high-resolution textures.
- TexFusion demonstrates aggregating predictions across multiple renders to produce globally coherent textures with image diffusion models.
- Open implementations like MaterialAnything show end-to-end diffusion-based pipelines adapted for PBR materials.
What is image-Guided Texture Generation?
Short definition: Image–guided texturing transfers or uses photographic reference imagery (or hand-painted art) to directly control the look of a texture on a UV-mapped asset. The focus is on reproducing real-world appearance accurately rather than inventing appearance from scratch.
Why it matters: if a shot or an asset needs to match a specific real-world product (a brand’s logo pattern, the specific grain of leather, a prop used on-screen), image guidance reduces ambiguity and ensures predictable results.
How it typically works (high-level)
- Capture high-quality photos of the reference material (controlled lighting, multiple angles, calibrated color if important).
- Align, crop, and—if necessary—undistort images to match UV proportions.
- Use specialized transfer/mapping tools or neural networks to synthesize UV-space textures that reflect the reference’s color and microstructure.
- Generate or estimate PBR channels (roughness, normals) from the reference, possibly with learned estimators.
- Hand-tweak seams and lighting in a painting or compositing tool.
When you need high fidelity and photometric correctness (film close-ups, product photography, e-commerce renders), image guidance is usually the safer choice.
UVs, UDIMs, and why mapping still rules everything
Before any automatic method produces a usable result, your UVs must be sensible. Bad UVs undermine both automated and guided methods.
Key practical points:
- Minimize stretching: If your UV islands are uneven, diffusion-based patches will stretch and create visible artifacts after projection.
- Seam placement: Place seams where natural discontinuities exist (garment edges, interior seams) rather than in a hero face area.
- UDIMs for detail: For characters and hero props, split into UDIM tiles. High-resolution skin or costume maps often live on multiple UDIMs to keep texel density consistent.
- Texel density: Define a target texel density for your asset class and stick to it across a scene for a consistent look.
In real use, I noticed that a small investment in UV cleanup (30–60 minutes per hero prop) often saves hours of seam-fixing after automatic generation.
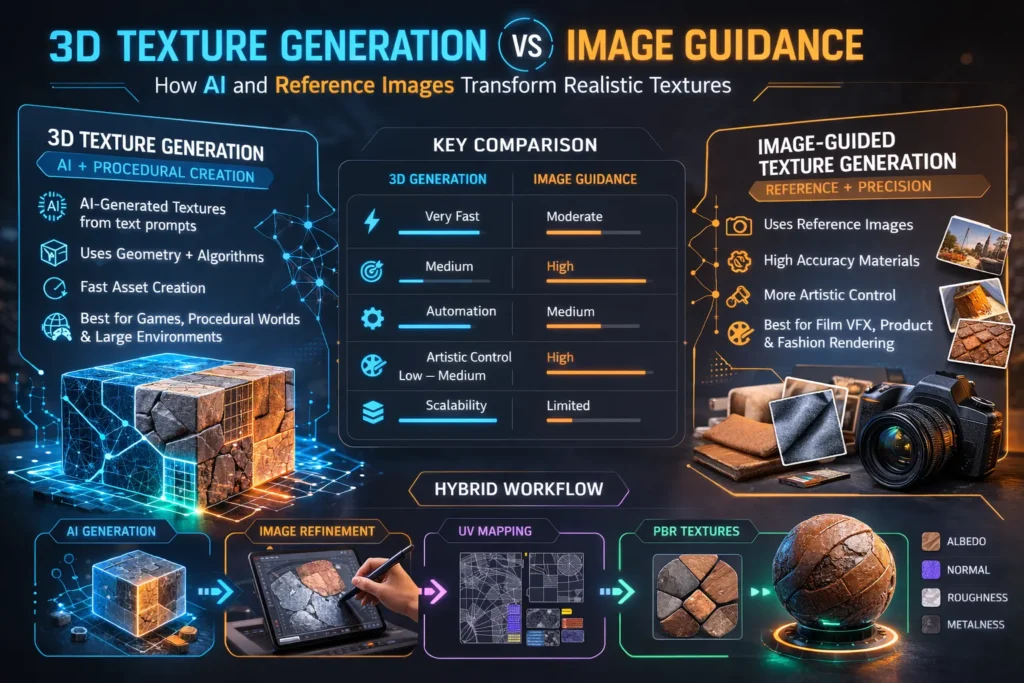
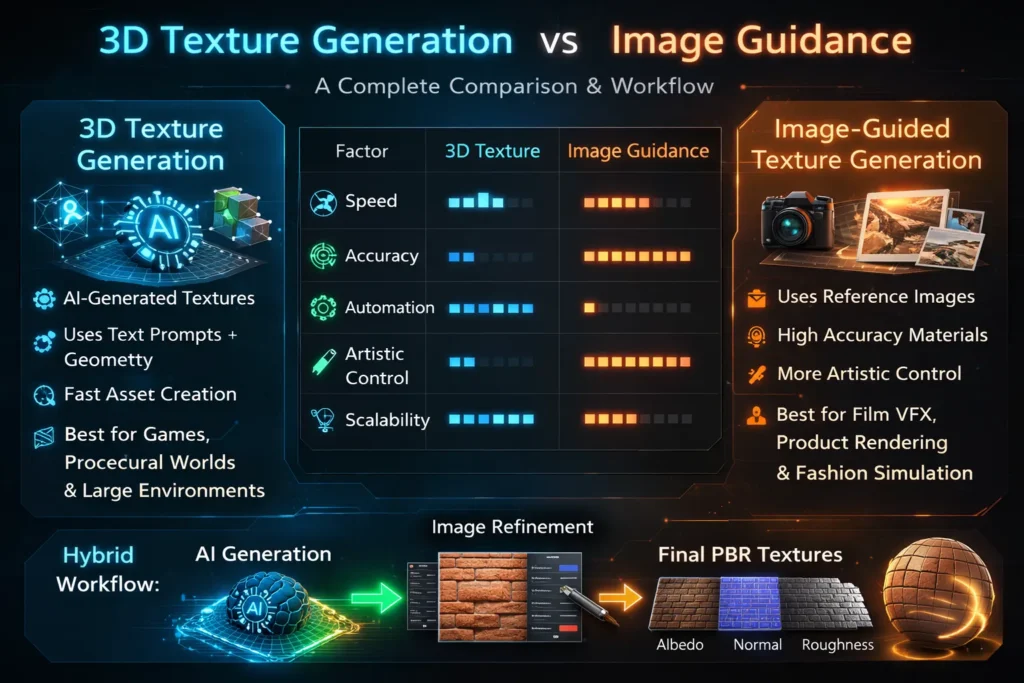
Head-to-head practical comparison
Below is a pragmatic comparison to help choose a direction for your next project.
- Primary input
- 3D texture generation: geometry + prompts or param sets.
- Image guidance: geometry + reference photographs.
- Control
- 3D generation: moderate (you can constrain style via prompts/seed, but fine detail placement is probabilistic).
- Image guidance: high (you can copy exact details, logos, patterns).
- Scale
- 3D generation: excellent for bulk and variation.
- Image guidance: best for targeted, high-accuracy assets.
- Speed
- 3D generation: fast for drafts and libraries.
- Image guidance: slower due to pre-processing and manual fixes.
- Typical failure modes
- 3D generation: seam artifacts, inconsistent lighting, unrealistic microstructure.
- Image guidance: non-matching perspective, bad color calibration, visible stitch lines.
One thing that surprised me: For mid-distance environmental props (lamps, chairs), generated textures often needed less polishing than the artist anticipated — the human brain accepts moderate realism at that distance, so full photoreal fidelity isn’t always necessary.
Real production pipelines
Pipeline A — Procedural / 3D texture Generation
Steps & tools (typical setup)
- Mesh prep & UVs — Blender for quick UVs and light cleanup.
- Multi-view renders — Bake or render the mesh from multiple angles to produce inputs for the diffusion model.
- AI synthesis — Use a 3D-aware diffusion system (Text2Tex/TexFusion/MaterialAnything style) to create patches conditioned on the mesh and prompt.
- Stitching — Automatic UV stitching by the pipeline; manual seam fixes in Substance Painter if needed.
- Map generation — If normals and roughness are not provided, estimate via neural tools or procedural filters; polish in Painter.
- QA — Test in renderer or engine; iterate on prompts/parameters.
When to use: Large open-world props, background assets, rapid prototyping, procedural material generation for runtime.
Pipeline B — Image-Guided Transfer (accurate, careful)
Steps & tools (typical setup)
- Reference capture — Photograph in controlled light (ideally with a color card and diffuse/studio lighting).
- Align to UVs — Use projection tools to align reference to UV shells.
- Transfer & synthesize — Use style-transfer or mapping tools to project textures and repair mismatches.
- Create PBR channels — Estimate normals and roughness from the reference using neural maps, or hand-paint where necessary.
- Seam and bake — Clean seams and bake into UDIMs if required; finish in Substance Painter or Blender.
- Test render — Match lighting conditions to the shot and refine.
When to use: Hero props, digital doubles, product shots, film VFX.
Tools & platforms — practical notes
A short, hands-on look at the tools you’ll likely encounter.
- Text2Tex — Text2Tex: strong for text-driven synthesis with view-aware inpainting; great reading for engineering teams.
- TexFusion — TexFusion: introduces aggregation of denoising predictions across views to produce consistent textures. Useful for teams aiming for higher global coherence.
- Blender — Blender: free, crucial for mesh prep, UVs, and multi-view renders. If you aren’t using Blender (or equivalent) you’re doing extra manual work.
- Adobe Substance 3D — Substance 3D: industry standard for paint-and-polish workflows; indispensable for seam-fixing and finalizing PBR maps.
- MaterialAnything — MaterialAnything (GitHub): practical repo showing end-to-end diffusion pipelines for materials; good for R&D and prototyping.
(Each of the above sources has useful code or papers you can adapt into production pipelines. Links in the “Key sources” section below.)
Step-by-step Blender example
This is a concise but practical example you can replicate quickly.
Goal: create a weathered, brushed-steel texture map for a mechanical prop.
- Clean the mesh in Blender: remove duplicated vertices, apply scale transforms, and ensure normals are correct.
- UV unwrap with focus on texel density: give face plates slightly higher density than bolts.
- Render multi-views: generate 6–12 renders at 1024 px of the object with neutral lighting (HDRI + fill).
- Prompt example for AI Generator: “weathered brushed stainless steel, subtle radial brushing, micro-scratches, medium roughness, faint patina near edges” — use this when running Text2Tex/TexFusion-style tool.
- Run synthesis: feed renders and prompt to your chosen generator; produce partial patches.
- Stitch: export the UV maps and stitch the patches into UDIM tiles.
- Create normal/roughness: either have the pipeline output roughness/normal maps or generate normals by baking high-frequency detail from the albedo using tools or neural estimators.
- Polish in Substance Painter: add edge wear, anisotropic brushing (if needed), and paint masks for corrosion.
In real use… small prompts or slight HDRI changes can dramatically affect metal appearance. I noticed that anisotropy and micro-scratch direction are the two things the AI tends to get “close but not quite” — you’ll probably fix those in Painter.
Hybrid workflows — the Pragmatic Best Practice
Most experienced teams I’ve worked with adopt a hybrid approach. A practical hybrid flow:
- Generate a base with AI (fast, gives a rough look/scale).
- Capture references for hero portions (photography or curated images).
- Transfer specific features from photos onto the AI base using projection or image-guided correction.
- Finalize in Substance/Blender, focusing human hours only on hero regions and seams.
This combination yields the speed of automation plus the fidelity of image guidance where it matters most.
Case studies
Game studio: large open world (environment props)
- Problem: thousands of assets, tight schedule.
- Approach: automatic generation for background props, manual polish for hero props.
- Result: 60% faster throughput; artists focused on hero assets and shaders.
VFX studio: close-up leather jacket
- Problem: exact match required to on-set prop.
- Approach: multi-angle photography + image-guided transfer + UDIM baking.
- Result: perfect match for close-ups; longer pipeline but accepted as necessary.
Common pitfalls and how to avoid them
- Bad UVs — fix before automatic pipelines. Time invested here saves time later.
- Single-view generation — always generate from multiple views; single-view causes seams and stretch.
- Ignoring lighting — both AI and image-guided methods are sensitive to lighting differences between reference images and the target scene.
- Overtrusting the AI — generated normals or roughness maps can be unrealistic; cross-check with physical intuition or measurement.
One honest limitation
Automatic 3D texture generation still struggles with absolute photometric correctness — meaning small-scale microstructure, real-world specular response, and exact color matching under mixed lighting can be off. If your deliverable is a product catalog where the color must match manufacturing samples exactly, automated pipelines are likely to require significant manual correction.
Who should use which method — a decision shortlist
Use 3D texture Generation if:
- You need high throughput for many assets.
- Assets are mid- to background elements.
- You’re prototyping concepts or creating large material libraries.
- You have limited artist hours and need many variations.
Use image-guided texturing if:
- You need pixel-accurate replication of real materials.
- The asset will be seen up close (film, advertisements, product visualizations).
- Brand fidelity or legal replication (logos, trademarks) is required.
Avoid automated-only paths if:
- Color matching to physical samples is mandatory.
- The shot is a hero close-up where human judgment matters.
Pricing and tooling overview
- Open-source/research: TexFusion, Text2Tex papers for methodology; MaterialAnything on GitHub for prototype pipelines.
- Industry / commercial: Adobe Substance (Painter/Designer/Sampler) for finishing and polishing; Blender for prep and baking.
- Enterprise: custom in-house pipelines or licensing R&D tools for production-scale automation.
Best practices checklist
- Clean geometry and normalize transforms.
- Unwrap with consistent texel density.
- Use UDIMs for hero assets.
- Render multi-view inputs for AI pipelines.
- Keep reference photos well-lit and color-calibrated for image-guided workflows.
- Always test textures under multiple lighting setups (HDRI + directional).
- Reserve human polish for hero details and seams.
FAQs: 3D Texture Generation vs Image Guidance
3D texture Generation invents textures (fast, broad), image guidance copies or transfers textures (accurate, targeted).
Absolutely — generate a base with AI, then refine key areas with image-guided transfer and human polish.
For hero or film assets: yes. For small props, often a single UV map is fine.
Usually, yes, but verify the licensing and training data policy of the specific tool you use.
Real Experience/Takeaway
I’ve run both methods on the same prop (a metal lantern used both in background gameplay and a hero cinematic). Here’s the condensed takeaway:
- Speed vs. fidelity: AI-based generation got us to a usable look in under an hour. The image-guided refinement (photography + projection + seam fix) took about 4–6 hours but produced a match-perfect hero render.
- Artist time allocation: automation freed senior artists to work on creative shader decisions, not repetitive painting — a high-impact tradeoff.
- Quality control: always test textures in the final lighting/renderer; a “good” texture under studio HDRI can still look wrong under outdoor lighting.
One honest limitation: in a product shoot, color metamerism under different lighting conditions revealed small mismatches that required rephotographing the sample — automation didn’t help here.
Who this is best for — and who should avoid it
Best for:
- Indie and mid-size game studios are automating large asset libraries.
- Freelance artists who need fast concept iterations.
- VFX teams that want a hybrid of speed and precision.
Avoid if:
- You must produce exact color-matched product images for manufacturing QA without tolerance.
- You lack people who can clean UVs and do QA; automation only helps when the prep is solid.
Key sources
- Text2Tex — Text2Tex (paper & PDF).
- TexFusion — TexFusion (paper & PDF).
- Blender — Official Blender site (downloads & docs).
- Adobe Substance 3D — Substance 3D (tools & resources).
- MaterialAnything — MaterialAnything (GitHub & project page)
- Meta AI/research pages (context on research labs and generative work).
Conclusion: Choosing the Right Texture Workflow
- Prototype now (fast): Take a mid-detail prop, clean UVs, render 8 views, run a Text2Tex/TexFusion-style pipeline or MaterialAnything, then polish in Substance. Timebox to 3–4 hours to see if the quality meets your needs.
- High-fidelity route: plan a 1-day shoot for references, transfer via projection, bake UDIMs, and polish. Expect 4–8 hours per hero asset.
R&D: if you’re a studio, set up a small experiment comparing cost/time/quality across 10 props (5 auto, 5 image-guided), measure polish time and final pass rates.